This easy focaccia bread helps you make bakery-style focaccia at home with one bowl, no kneading, and very little hands-on time.
For more easy bread recipes, check out our flatbread pizza, black pepper focaccia, pita bread, and Tuscan schiacciata.

Don’t Lose This Recipe
Why you’ll love this easy focaccia bread!

This easy focaccia bread is the recipe Louise and I make when we want something reliable, comforting, and deeply satisfying without spending all day in the kitchen 🍞
Over the years, I’ve studied bread, pizza, and focaccia in Italy and beyond—from Rome to Copenhagen—but this is the recipe I always come back to at home. It takes those basics and strips them down to what really matters, the way my nonna Lidia used to cook: simple steps, good olive oil, and no unnecessary fuss.
Most importantly, this recipe has been tested in real kitchens. Readers have shared photos, comments, and messages through the blog and our socials, after our focaccia videos reached many people.
You’ll get a no-knead focaccia that’s soft and airy inside, crisp on top, and easy to shape with just a spoon. It’s a homemade focaccia that works for beginners and busy home cooks alike.
Made with pantry staples and extra virgin olive oil, it fits naturally into a Mediterranean-style way of eating—simple, balanced, and meant to be shared 🫒😊
P.S. Got leftover focaccia? It reheats beautifully. Try it in a focaccia sandwich, a caprese sandwich, or simply tear it and dip it into creamy hummus.
Ingredients
Full ingredients and substitutions are in the recipe box below.
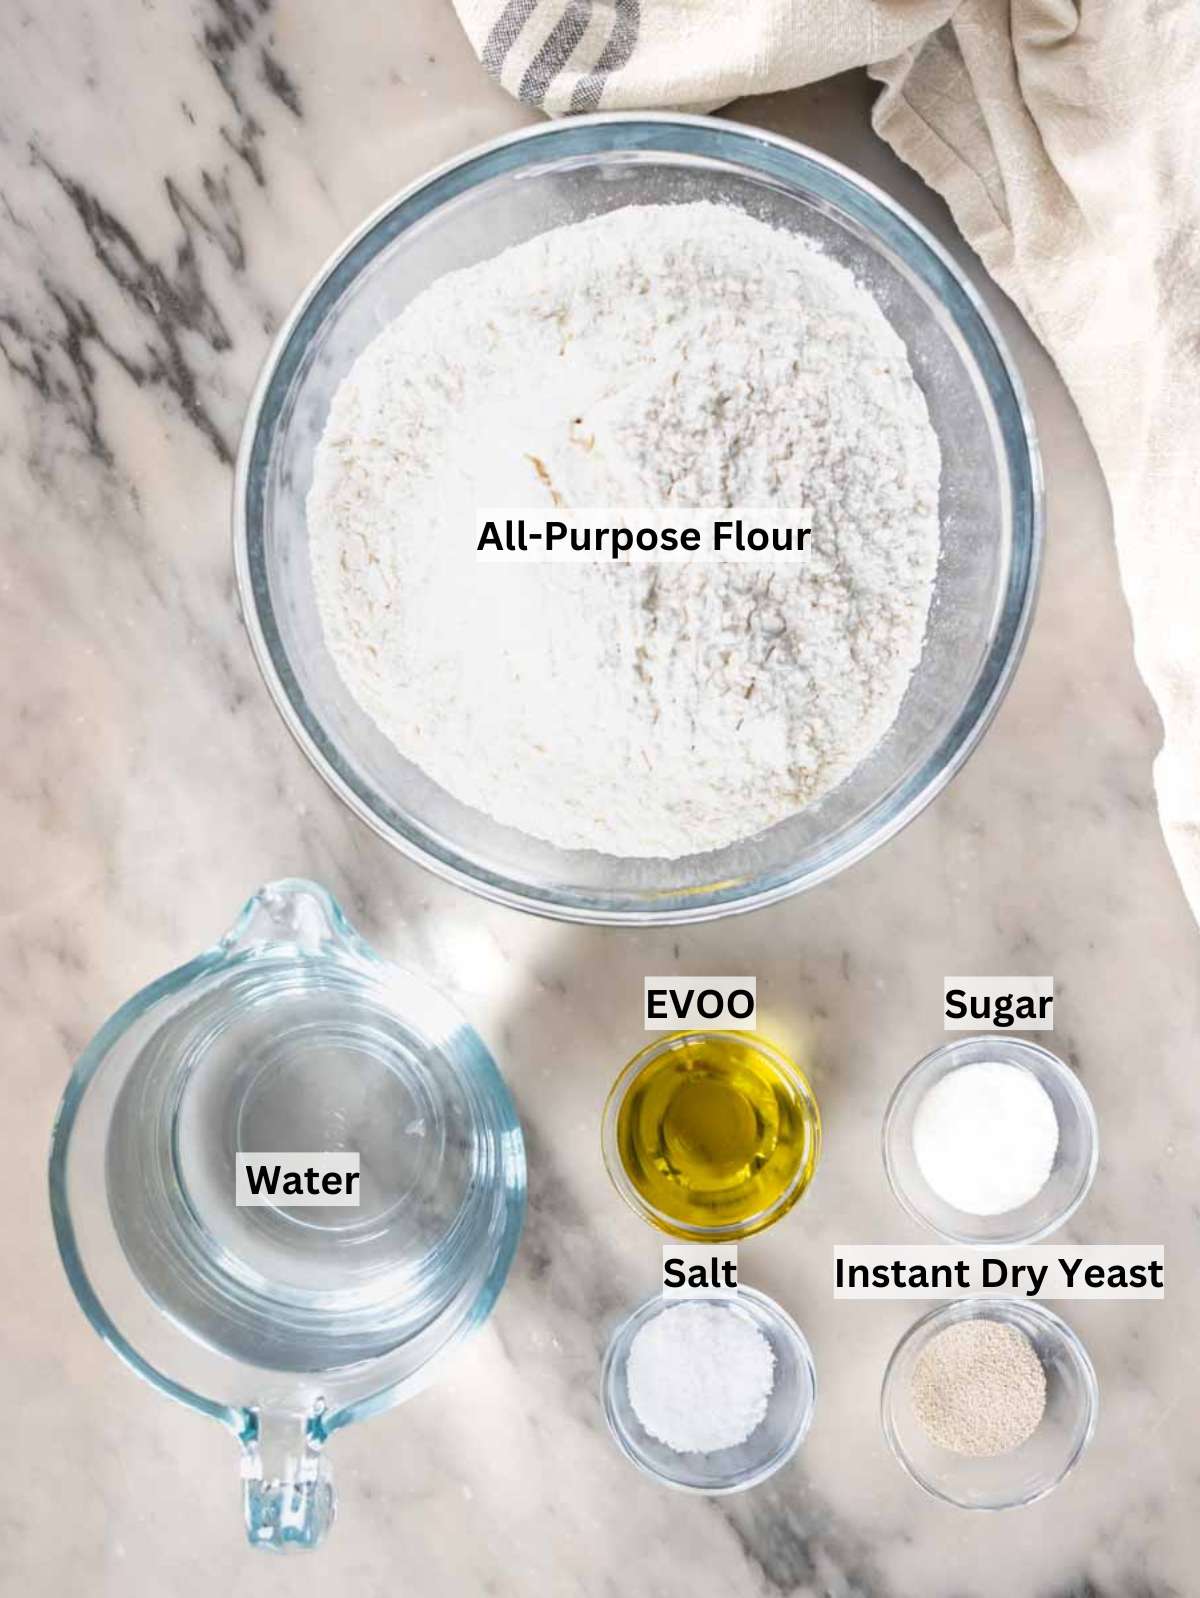
- Flour: All-purpose flour gives a soft, airy crumb and is ideal for this focaccia bread recipe. Substitute bread flour for a chewier bite, or use half whole-wheat flour for a heartier loaf.
- Water: Lukewarm water helps the dough rise evenly. You can replace a small part with potato cooking water for extra softness, a classic Italian focaccia trick.
- Instant dry yeast: Reliable and easy to use. You can substitute active dry yeast or use fresh yeast using three times the amount.
- Sugar: Helps the yeast get started and adds balance. Honey or maple syrup work well, especially for sweeter toppings.
- Salt: Essential for flavor in any good focaccia bread. Reduce slightly if using salty toppings like olives or anchovies.
- Extra virgin olive oil: Adds flavor and keeps the crumb tender, key to authentic Italian focaccia. A mild olive oil works if you prefer a lighter taste.
- Rosemary (optional): Classic and aromatic. Substitute thyme, oregano, sliced olives, onions, tomatoes, or grapes to turn this base into many focaccia bread variations.
Pan choice and texture
Oil or line the pan
Focaccia dough is very sticky, so the pan must be well prepared.
Use at least 2–3 tablespoons of olive oil to grease the pan, or line it with parchment paper if you prefer to use less oil. This prevents sticking and helps the focaccia bake evenly.
Choose your pan based on the texture you like
- 10–11 inch round pan: A good option for classic round focaccia.
- 9×13-inch pan: Medium-thick focaccia with a soft crumb and crisp edges. Great for everyday baking and focaccia sandwiches. This is the pan used in the photos and video.
- 13×18-inch sheet pan: Thinner and crispier focaccia. Ideal for focaccia pizza or cutting into small pieces.
- 8×8-inch pan: Thick and bready focaccia. Works well as a simple homemade bread.
- 9×9-inch pan: Slightly thinner than an 8×8, but still soft and fluffy.
How to Make Focaccia Bread at Home
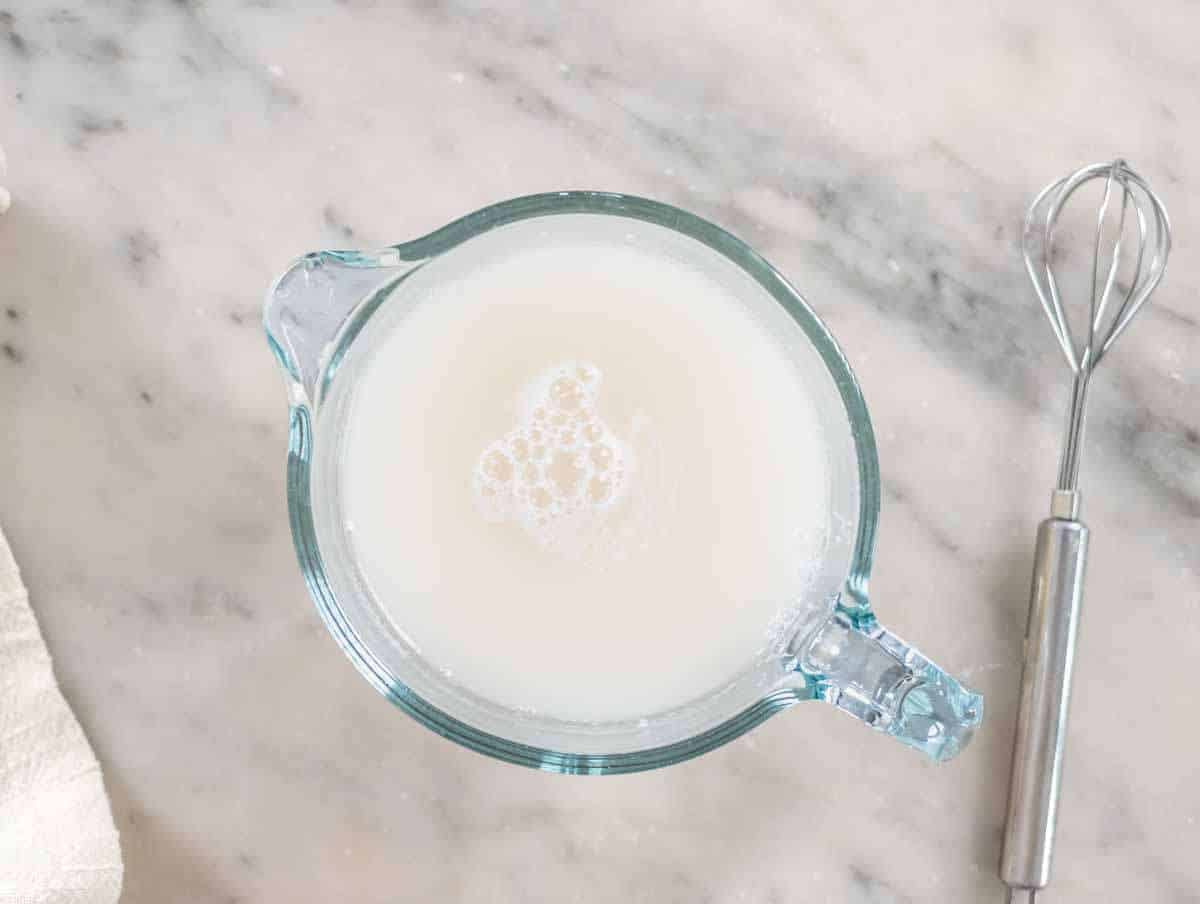
Step 1: Bloom the yeast
Measure all the dough ingredients first.
Add the lukewarm water, yeast, and sugar to a small bowl.
Whisk well and set aside for about 30 seconds.
The yeast should fully dissolve in the water.
If it doesn’t, the yeast may be old—start again with fresh yeast.
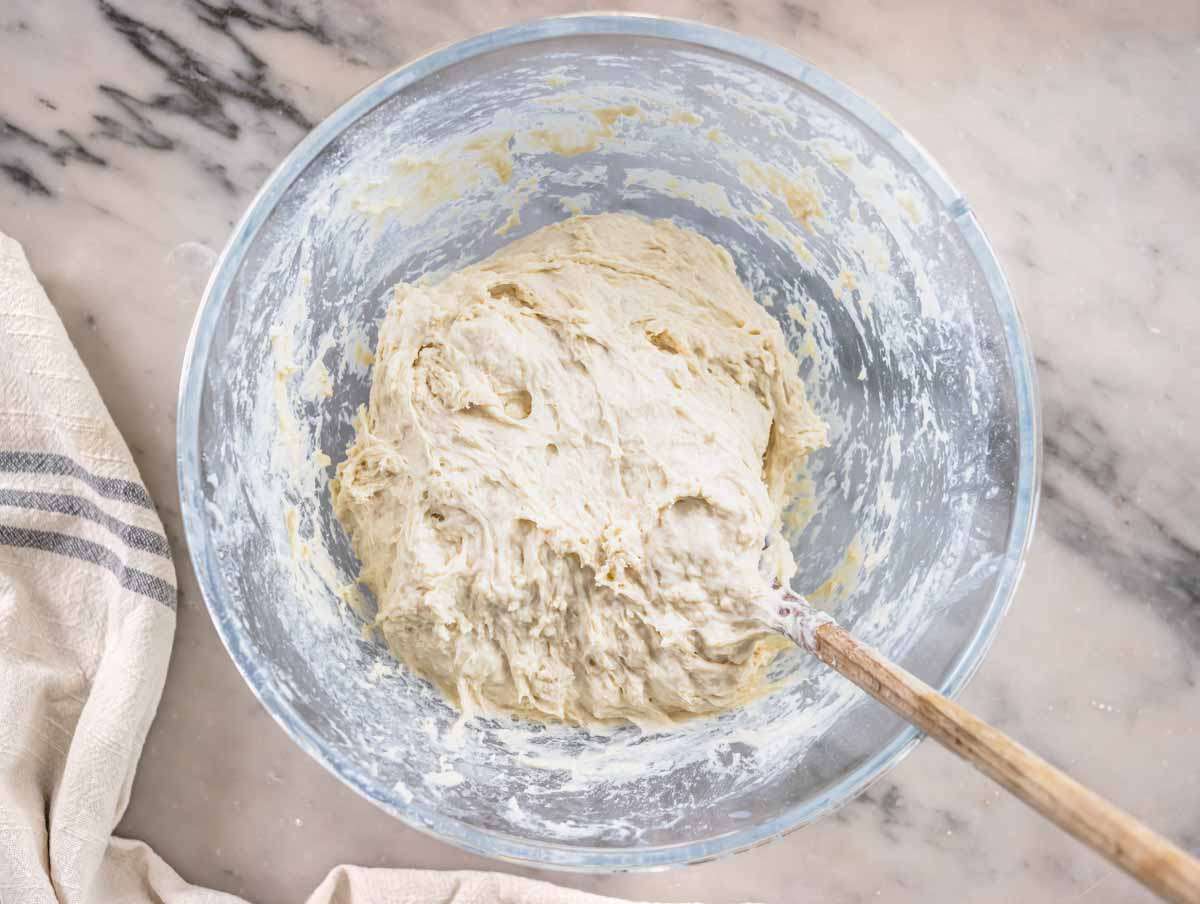
Step 2: Mix the dough
Add the flour and salt to a large bowl.
Stir to combine.
Pour in the yeast mixture.
Stir with a wooden spoon until you get a wet, sticky dough. This takes about 1 minute.
Add the olive oil and stir again until the oil is mixed in.
The dough will stay soft and sticky. That’s exactly right.
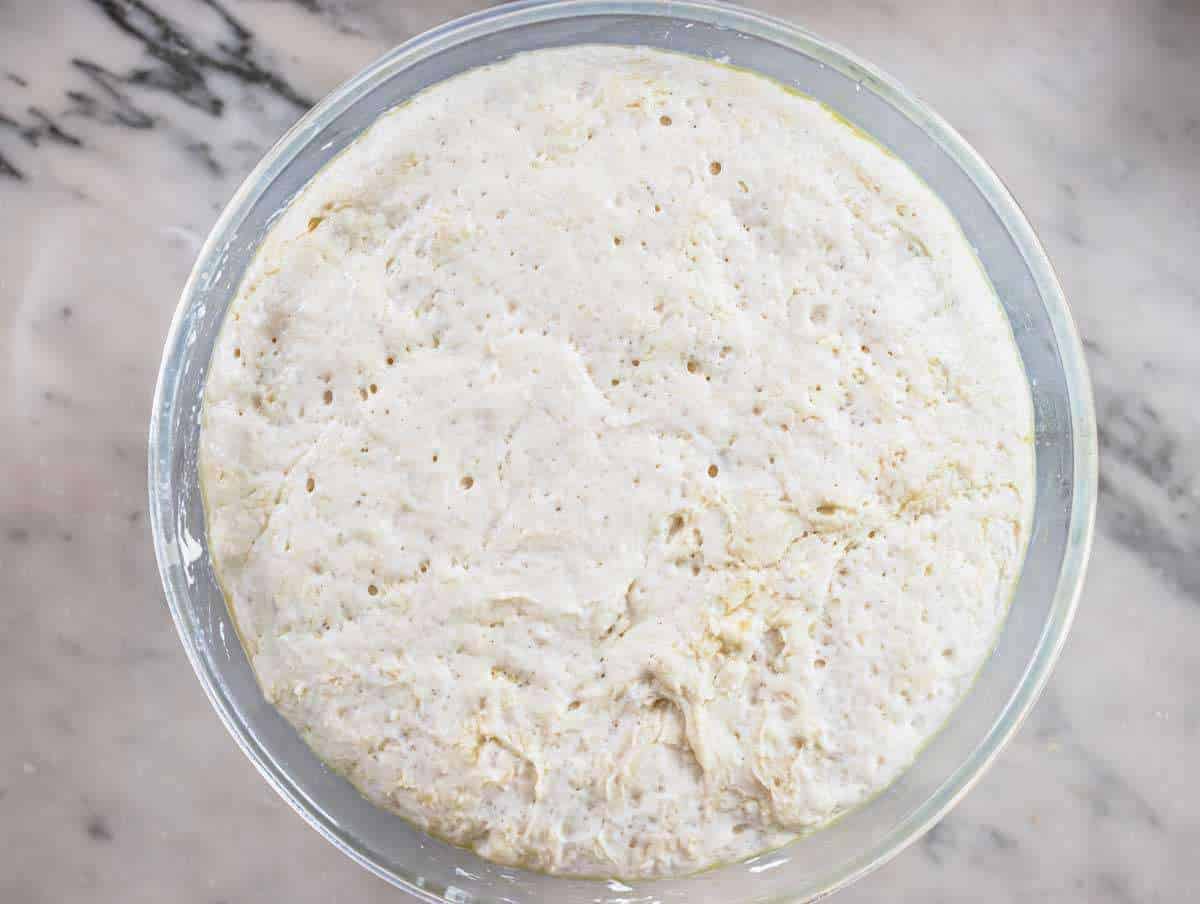
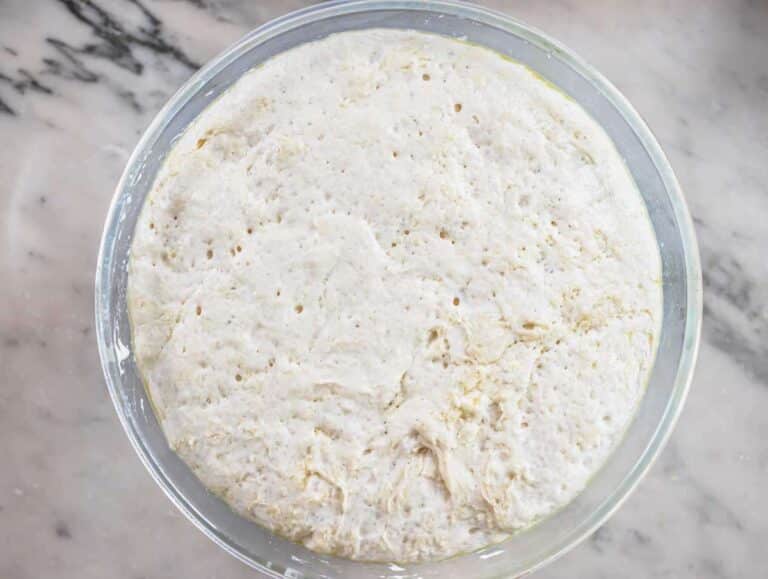
Step 3: First rise (choose one method)
Quick rise: Cover the bowl with a damp cloth or plastic wrap, leaving space for the dough to grow.
For the most reliable rise, place the bowl in a slightly warm oven.
To do this, turn the oven on for 60 seconds, then turn it off.
Place the bowl inside and let the dough rise for 1½ to 2 hours, until doubled in size.
You can also let the dough rise at room temperature, especially in warm weather.
If your kitchen is cool, as it often is in winter, the rise will simply take longer.
Slow rise: Cover the bowl and place it in the fridge for 8 to 24 hours.
When ready, take the dough out and let it sit at room temperature for 2 to 3 hours.
Both methods work well and give you great flavor.
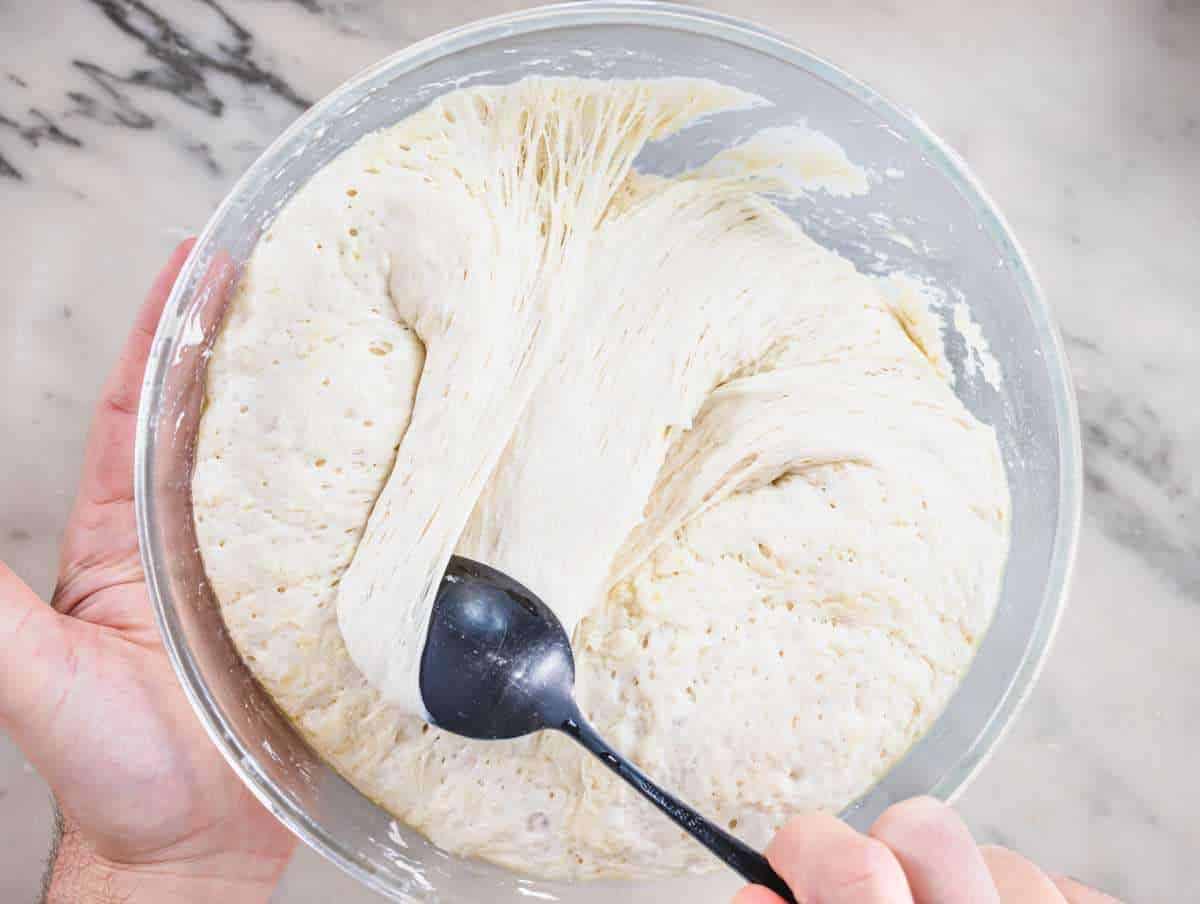
Step 4: Fold the dough
Once the dough has risen, fold it over itself 20 to 30 times. Use a spoon and fold from the edges toward the center. This takes about 1 minute.
Stop when the dough feels slightly tighter and smoother.
Step 5: Second rise in the pan
Grease your baking pan generously with olive oil.
This step is essential—focaccia dough is very sticky and will stick to the pan without enough oil.
If you prefer to use less oil, line the pan with parchment paper instead (less flavor).
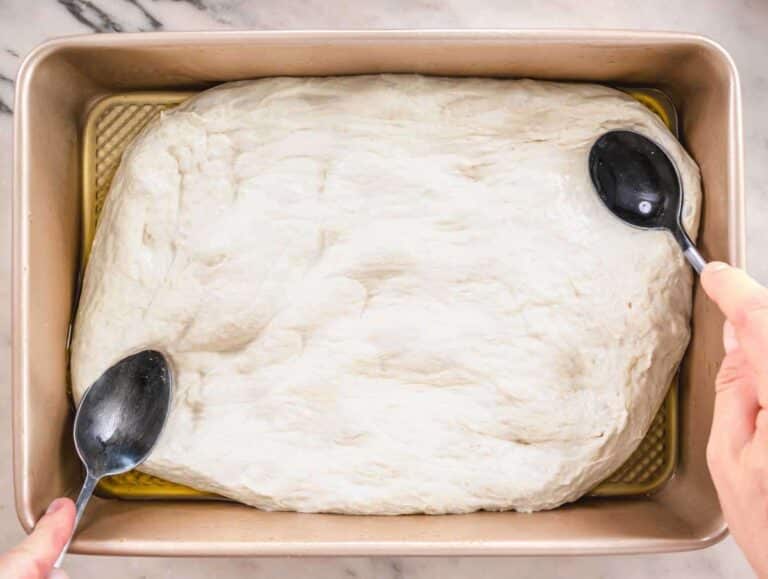
Transfer the dough to the pan.
Use the back of two spoons to gently spread it toward the edges.
Wet the spoons with water so they don’t stick.
It’s fine if the dough looks uneven or a little wet.
Cover and let rise again for 45 minutes in a warm spot.

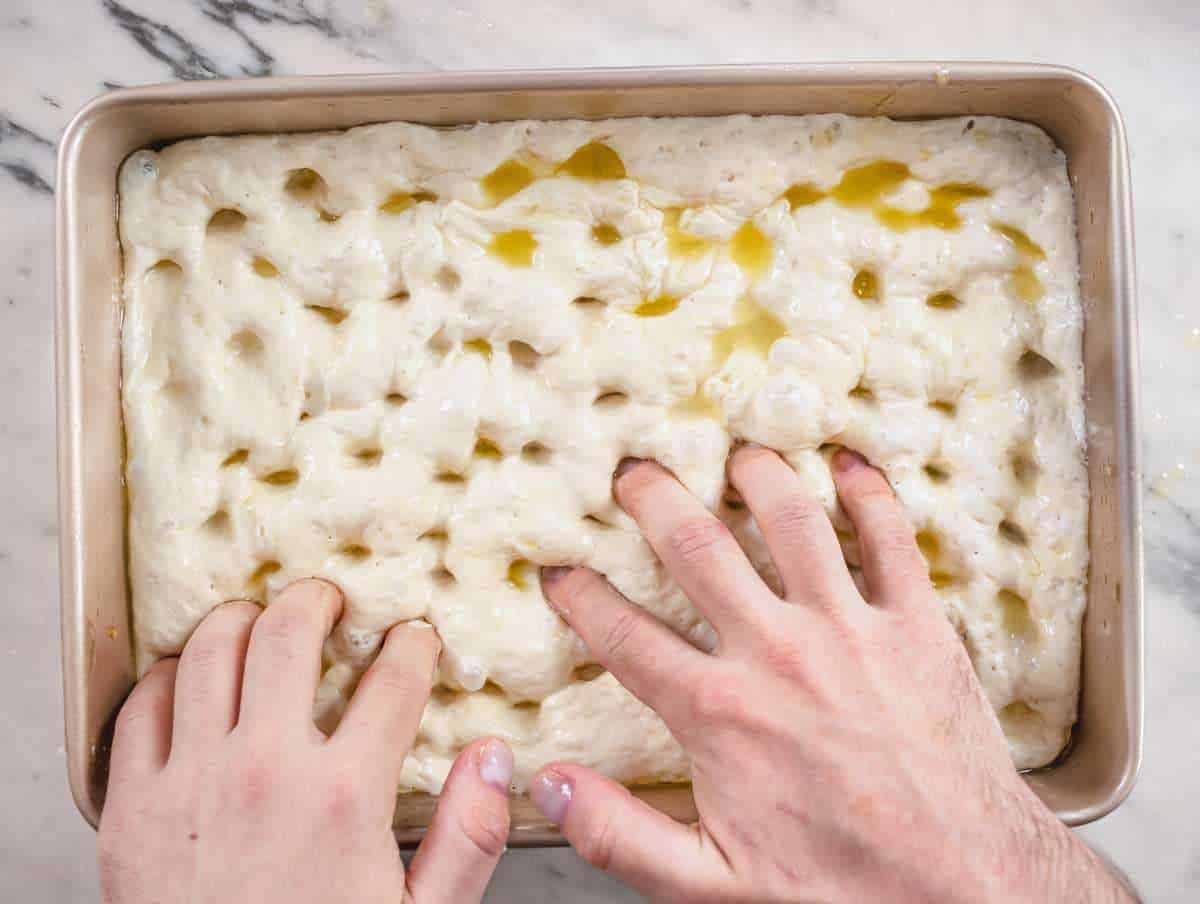
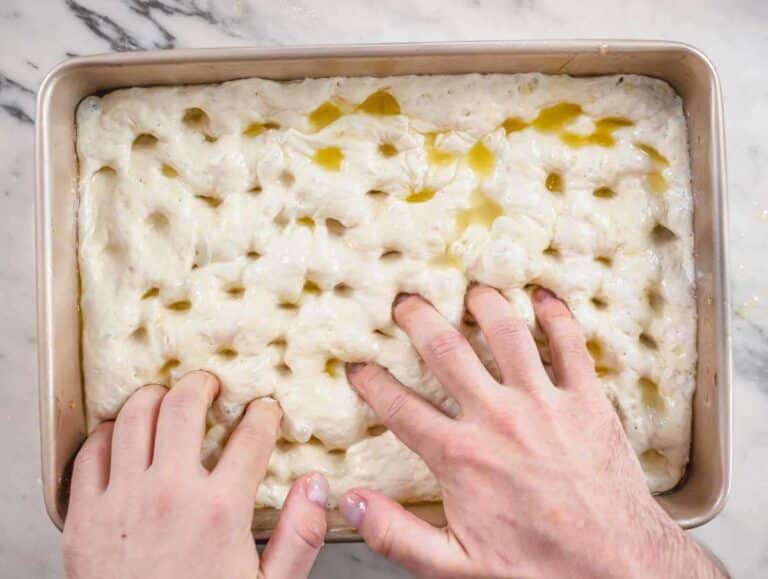
Step 6: Dimple and top the focaccia
While the dough rests, preheat the oven to 450°F (230°C).
In a small bowl, mix the olive oil, water, and salt until the salt dissolves.
Dip your fingers into the oil-water mixture and press deep dimples all over the dough.
Pour the remaining mixture evenly on top, letting it flow into the dimples.
Add rosemary or other toppings if you like.
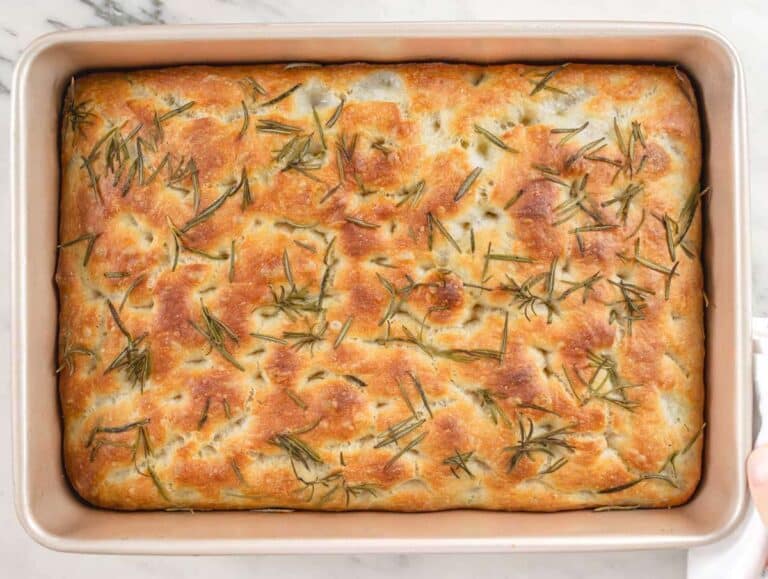
Step 7: Bake
Bake at 450°F (230°C) on the medium-low rack for 20 to 25 minutes.
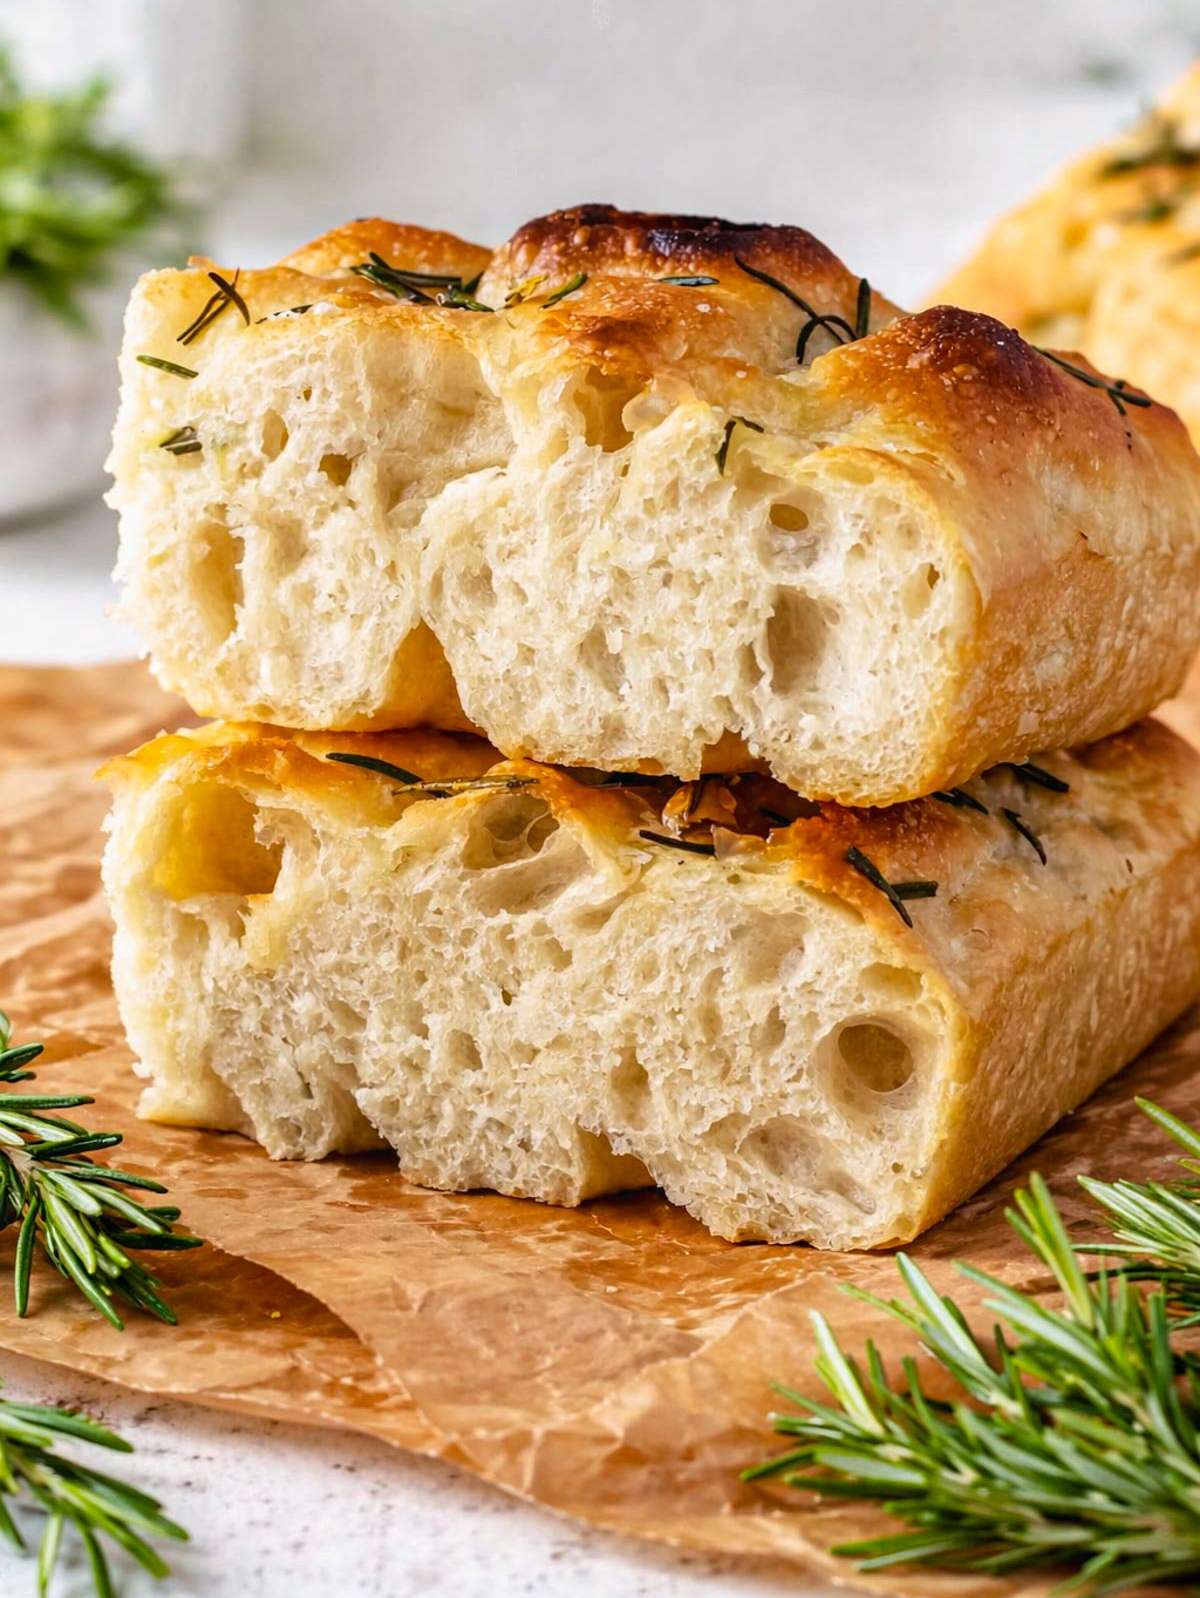
The focaccia is ready when the top is golden, the bottom is well baked, and the inside stays soft.
Let cool for at least 5 minutes before removing from the pan, slicing, and serving.

Tips
- Use enough olive oil in the pan: Focaccia dough is very sticky. Oil prevents sticking and helps create a crisp bottom.
- Don’t worry about sticky dough: This dough is meant to be wet. A sticky dough gives focaccia its soft, airy texture.
- Look for the rise, not the clock: Proofing times can vary. The dough should roughly double in size before moving on.
- Press deep dimples: Use your fingertips and don’t be shy. Deep dimples help the oil settle in and create classic focaccia texture.
- Bake until well colored: Focaccia should be golden on top and baked through on the bottom. Pale focaccia tastes flat.
- For lower sodium needs: Traditional focaccia uses the full amount of salt listed for proper flavor. If you’re watching sodium, you can reduce the dough salt to 1 teaspoon and use less salt in the topping. The focaccia will be milder, but still enjoyable.
Frequently Asked Questions
Yes. You can use the slow-rise method and let the dough rest in the fridge overnight. This fits well into busy schedules and still gives great flavor.
That’s normal for Italian focaccia. A wet dough helps create a soft, airy crumb and an open texture once baked.
Absolutely. A larger pan makes thinner, crispier focaccia, while a smaller pan gives a thicker, breadier result. Adjust baking time slightly as needed.
Yes. This base works well for many focaccia bread variations like tomatoes, onions, olives, grapes, or black pepper.
Let it cool completely, then store it at room temperature in a sealed container or plastic bag for up to 3 days. For longer storage, freeze it and reheat before serving.
Yes. Warm it in a hot oven or air fryer for a few minutes to bring back the crisp edges and soft center.
What to Serve With Focaccia
- Greek chickpea soup
- Mediterranean lentil soup
- Chickpea noodle soup
- Tuscan white bean soup
- Greek bean salad
- Chickpea cucumber salad
- Creamy red lentil soup
- Mediterranean chickpea soup
If you tried this Focaccia recipe or any other recipe on our blog, please leave a 🌟 star rating and let us know how it goes in the comments. We love hearing from you!

Easy Focaccia Bread (No Knead, One Bowl)
Video
Equipment
- 9×13-Inch (23×33 cm) rectangular baking pan: See the notes below the recipe for more pan options
Ingredients
- 1¾ cups lukewarm water not hot, just warm to the touch
- 2 teaspoons instant dry yeast see notes for substitutions
- 2 teaspoons sugar helps activate the yeast
- 4 cups all-purpose flour bread flour also works
- 3 teaspoons salt essential for classic focaccia flavor
- 4 tablespoons extra virgin olive oil divided
For the topping
- 2 tablespoons extra virgin olive oil
- 3 tablespoons water
- ½ teaspoon salt + optional flaky salt
- ½ teaspoon rosemary optional, fresh or dry
Instructions
- Bloom the yeast: Add 1¾ cups lukewarm water, 2 teaspoons instant dry yeast, and 2 teaspoons sugar to a small bowl. Whisk and rest for 30 seconds, until the yeast dissolves. If it doesn’t dissolve, start again with fresh yeast.

- Make the dough: Add 4 cups all-purpose flour and 3 teaspoons salt to a large bowl and stir. Pour in the yeast mixture and mix with a spoon until sticky.Add 2 tablespoons Extra Virgin Olive Oil and stir again. The dough will be wet and soft. That’s correct.

- Cover the bowl with a damp cloth or plastic wrap.Quick rise: For the most reliable results, place the bowl in a slightly warm oven. Turn the oven on for 60 seconds, then turn it off. Let the dough rise for 1½ to 2 hours, until doubled in size.You can also let it rise at room temperature. In cooler kitchens, this will take longer.Slow rise: Cover the bowl and place it in the fridge for 8 to 24 hours. When ready, take the dough out and let it sit at room temperature for 2 to 3 hours.
- Fold the dough: Fold the dough over itself 20 to 30 times using a spoon. Fold from the edges toward the center. This will take about a minute. Stop when the dough feels tighter.

- Second rise in the pan: Grease the pan well with 2 tablespoons Extra Virgin Olive Oil. Focaccia is very sticky. You can use parchment paper instead if you prefer less oil.Add the dough to the pan and gently spread it with the back of two wet spoons. Cover and let rise again for 45 minutes.In the meantime, preheat the oven to 450°F (230°C).
- Dimple and top: Mix 2 tablespoons extra virgin olive oil, 3 tablespoons water, and ½ teaspoon salt in a small bowl.Dip your fingers into the mixture and press deep dimples into the dough.Pour the rest of the mixture on top. Sprinkle with ½ teaspoon rosemary or more if you like.
- Bake: Bake at 450°F (230°C) for 20 to 25 minutes, on the medium-low rack.The focaccia should be golden on top and soft inside. Cool for 5 minutes, then slice and serve.
Notes
- 9×13-inch: medium-thick, soft focaccia, great for sandwiches (used here)
- 13×18-inch: thinner and crispier, good for focaccia pizza
- 8×8-inch: thick and bready
- 9×9-inch: soft and fluffy, slightly thinner
- 10–11 inch round: classic round focaccia
- Oil the pan well: Prevents sticking and gives a crisp bottom
- Sticky dough is good: That’s how focaccia stays soft and airy
- Watch the dough, not the clock: It should double in size
- Press deep dimples: This helps the oil sink in
- Bake until golden: Pale focaccia lacks flavor
- Lower sodium option: Classic focaccia uses all the salt listed; reduce dough salt to 1 teaspoon and use less on top if needed
- Store and reheat: Keep focaccia at room temperature for up to 2-3 days; reheat in a hot oven or air-fryer to refresh the crust
- Longer storage: For more than 2 days, wrap well and freeze
Nutrition
Don’t Lose This Recipe


Hi! We are Nico & Louise
We're here to share easy, healthy, and delicious recipes 🌿✨.
Welcome to our blog, we are glad you are here.
I made this today, and it was super easy and delicious!